For a simple look you only need 3 brushes. Get a decent quality brush. If the hairs are going all over the place, or if the brush doesn't seem to "pick up" the eye shadow, you might need to get a better brush.
First you need a highlight brush. This brush you will use to highlight your brow bone - just under the eyebrow. It's not real big, and it might be a little dome shaped.
 |
| Highlight brush |
Next you will need an all over face brush. This will look like the highlight brush, but it will be bigger and flatter. These flat bristles are designed to really pick up your eyeshadow. This is the perfect shaped brush to apply a base color (if you are using multiple colors, or even if you are doing something funky, like a smokey eye).
 |
| All over shadow brush |
For comparison sake, I have put the all over shadow brush and the highlight brush side by side.
 |
| Left is the highlight, Right is all over shadow |
 |
| Tapered brush |
Now, to enhance your naturally beautiful eye! I will be using the Naked Palette from Urban Decay.

 |
| (make sure you rub it in) |
Then you use the highlight brush to highlight/enhance your brow bone. This should be a soft light color, or a nude color a couple of shades lighter than your natural skin tone. Here I am using Virgin.


Next step, use the all over shadow brush to apply a natural color, or a neutral shade with just a pop of color. (Remember, this is for a simple everyday look. You can take this technique and apply it to a bold look or a smokey look if you'd like). I am using Toasted. Apply this color to your entire eyelid, just until it meets the highlight color.

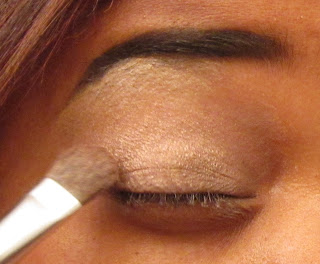


If you are going really basic you can stop here. This is a perfect look for work or running errands. If you want to add a little more definition, then get that fluffy/tapered brush and enhance your natural crease with a darker color. This should be the darkest color on your eyelid. Have trouble finding your crease? Than outline it with you eye open, then you will definitely see where it it. To make it look clean make sure you blend the highlight color down and the lid color up. I used Darkhorse.

 |
| Finding Crease |
 |
| Tracing the crease |
Here is the completed eye.

To really frame the eye. You can go ahead and apply eye liner the the outer third of your upper and lower lash line. Then you can top it off with mascara. Now your easy, simple eye look is done!


Thank you so much for taking the time to read this! I hope you enjoyed it, and I hope it was helpful. Please comment below and keep the blog ideas coming!!
Have a great night everyone,
~Kari

No comments:
Post a Comment